Split and Export a Chaffinch Embroidery
-
Choose Edit > Insert > Insert Design.
-
In the folder mySewnet/Samples/Stitch Editor/Stitch, open the embroidery Chaffinches.vp4.
-
In the Modify
 window of the Control Panel
  , click Split Design
  .
. -
Click the Options button to open the Splitting Options dialog.
See Splitting Options. -
In the Hoop and Layout Options tab, click Change Hoop.
-
If needed, in the Hoop Selection dialog select 240mm x 150mm - Universal Large Hoop 2, and set Orientation to Rotated. Click OK.
-
Set the Overlap to 20mm.
-
Click the Split Properties tab.
-
Ensure that Alignment Stitch Style is set to Corner, compensation is set to Low, and Connection is set to Trim.
-
Click OK to close the Options dialog. The split line is acceptable in its default position, so there is no need to adjust anything for this embroidery.
-
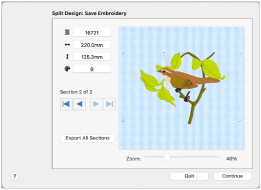
Click the Split button to open the Split Design: Save Embroidery dialog.
-
The top half of the split design is shown in the Preview area. Click Next
 and the lower section of the embroidery is shown.
 -
Move the slider to the center of the Zoom bar to see the embroidery section at the size it will be stitched. Swipe to see the alignment stitches at each corner of the embroidery. They are pale gray in color.
-
Zoom out to show the whole embroidery section again.
-
Click the Export All Sections button to show the Export dialog.
-
In the File Format popup menu, choose your embroidery format, and click OK. The Save As dialog appears.
-
In the dialog, browse to the folder mySewnet\My Designs. In Save As box, set the name as 'ChaffinchesExported’, then click Export. The split embroidery is exported as two separate files called 'ChaffinchesExported_01' and 'ChaffinchesExported_02'.
Note: If your machine only supports short file names, choose a shorter name. You can stitch out the sections in the order you think is most suitable for each split design. -
Click Continue. The Print Options page appears.
Note: If you have not saved the files a warning message is displayed.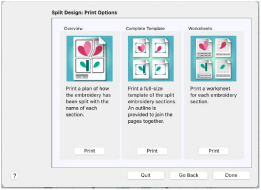
-
In the Overview area, click Print.
-
In the Print dialog click Print. An overview of how the embroidery was split is printed which also shows how each split section was named, and the number of stitches involved. Use this to determine the order which you think is best for stitching out the split sections.
-
In the Complete Template area click Print, and then Print. A full-size template of the split embroidery sections is printed, with an outline around each section to indicate how to join them together.
Note: Cut out the template and attach the sections as a guide for positioning fabric within the hoop. -
In the Print dialog, set Design Scale to 50%, and click Print to print the worksheets.
Note: The worksheets give the dimensions of the section, the number of stitches, information on the thread colors used and the Notes and Settings for the embroidery. -
Click Done to close the Split Design assistant.
-
Click OK to close the Split Design window.
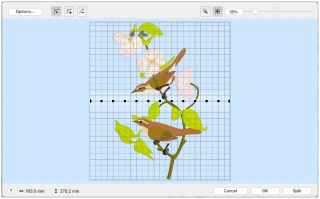
The chaffinch embroidery is displayed in the Split Design window with a suggested split line. See Split Design.
Note: Use the Trim option for Connection unless the split lines need to go through solid or heavy areas of stitching.
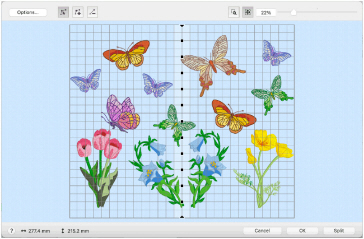
Split a Butterfly Garden Embroidery
-
Choose Edit > Insert > Insert Design.
-
In the folder mySewnet/Samples/Stitch Editor/Stitch, open the embroidery Butterfly Garden.vp4.
-
In the Modify
 window of the Control Panel
  , click Split Design
  .
. -
Click the Options button to open the Options dialog.
See Splitting Options. -
In the Hoop and Layout Options tab, click Change Hoop.
-
In the Hoop Selection dialog select 240mm x 150mm - Universal Large Hoop 2, and set Orientation to Natural. Click OK.
-
Set the Overlap to 60mm.
-
Set Across to 3. This is the number of hoops to be used.
-
Click the Split Properties tab.
-
Ensure that Alignment Stitch Style is set to Baste, compensation is set to None, and Connection is set to Trim.
-
Click OK to close the Options dialog.
-
In the Split Design window, click OK.
-
In the toolbar, click Zoom To Rectangle
 . The pointer changes to the zoom in pointer
  .
. -
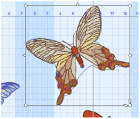
Drag to draw a rectangle around the large brown butterfly, then release the mouse button to zoom in.
-
Click the Freehand Select icon
 . The pointer changes to the freehand select pointer
  .
. -
Drag to draw a line that goes around the large brown butterfly, without including any of the butterflies nearby.
-
Release the mouse button when you have drawn the line nearly back to the starting point. The stitches making up the butterfly are selected, as indicated by the selection box around the butterfly.
Note: The selection box may be a little larger than the butterfly. This is because you may have selected some movement stitches that are not shown in 3D view. -
Drag inside the selection box to move the butterfly to the left by one grid square. The butterfly is now completely inside the center hoop position. If desired, use the arrow keys to nudge the butterfly into position.
-
Right-click to deselect the butterfly and the Freehand Select function.
-
Click Zoom To Fit
 and you will see how much the layout has changed. The embroidery will look better if the butterfly is left in its original position. This means it must be split.
 -
Choose Edit > Undo. The move to the butterfly is undone, and it returns to its original position.
-
In the Modify
 window, click Split Design
  to open the Split Design window.
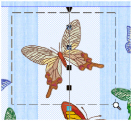
-
Click Zoom To Rectangle
 . The pointer changes to the zoom in pointer
  .
. -
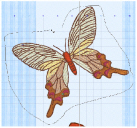
Drag to draw a rectangle over the large brown butterfly, then release the mouse button to zoom in.
It is easier to adjust the split line through the butterfly when you are zoomed in. -
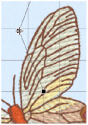
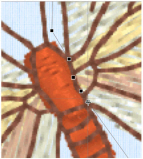
Move the mouse pointer over the upper point on the split line that is on the top wing of the butterfly. The mouse pointer changes to a cross pointer
 .
. -
Drag, and you move the point.
-
Click the Insert Point icon
 and the Insert pointer appears
  .
. -
Click to add four new points along the line that crosses between the wing and the body, then click Move Point
 to deselect the function.
Note: If you accidentally add an extra point, use the Delete Point icon to remove it.
 -
Drag these four points so that the split line follows around the outside of the body of the butterfly.
-
Click Zoom To Fit
 .
. -
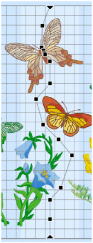
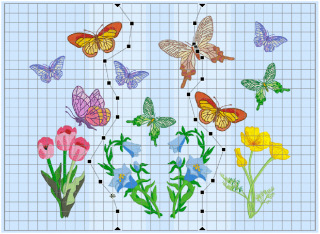
On the right-hand split line, there are two points that go through the wings of the small brown butterfly. Drag both points to the left, so that the split line clears the wings of the small butterfly.
-
There are three points in the blue flower. Drag each of these to the right so that the split line goes around the blue flower. Ensure that the split line does not go through the leaves of the yellow flower.
-
Move the mouse pointer over the second to top point on the split line on the left.
-
Move it clear of the butterfly’s wing.
-
Drag each of the points on the split line that goes through the butterflies or the blue flower, and move them so that the split line goes around the butterflies and flowers.
Note: Notice that the split line goes to the left of the blue butterfly that is on the overlap zone.
Ideally, it would be better if this butterfly was in the left-hand hoop area instead, as this would reduce the number of thread changes that were needed when stitching out, however as the right tip of the wing is in the next hoop, this cannot be done by moving the split lines. -
In the main screen, use Design Player
 to preview the stitching of the split sections of the embroidery with alignment stitches and export options included.
 -
In the Modify
 window, click Split Design
  to open the Split Design window again.
 -
Click the Split button. The Split Design: Save Embroidery dialog appears. The first section of the split design is shown in the Preview area. Notice the baste alignment stitches that form a rectangle on the section.
-
Click Next
 twice to see the other split sections.
 -
Click Export All Sections to save the project as numbered sections. The Export dialog appears.
-
In File Format, ensure that .vp3 is selected, then click OK. The Save As dialog appears.
-
In the Save In box, browse to the folder mySewnet\My Designs.
-
Click "New Folder", and name the new folder Butterfly Garden. Then browse to the new folder.
-
Enter the name ’ButterflyGardenExported’, then click Export.
-
Click Continue. The Print Options page appears.
Note: If you have not saved the files a warning message is displayed.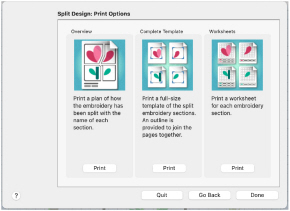
-
In the Overview area, click Print.
-
To print, in the Print dialog click Print. An overview of how the embroidery has been split is printed which also shows how each split section is named, and the number of stitches involved. Use this to determine the order which you think is best for stitching out the split sections.
-
In the Complete Template area click Print, and then Print. (If necessary, change printing to single side.) A full-size template of the split embroidery sections is printed, with an outline around each section to indicate how to join them together.
-
In the Print dialog, set Design Scale to 50%, and click Print to print the worksheets.
-
Click Done to close the Split Design assistant, then click OK to close the Split Design dialog.
The butterfly embroidery is displayed with a suggested split line. See Split Design.
Note: Use the Trim option for Connection unless the split lines need to go through solid or heavy areas of stitching.
Note: Notice that the largest brown butterfly covers the full width of the overlap zone on the right. This means that the butterfly is not completely in either of the hoops that overlap here. One solution is to move the butterfly so it is not split.
Note: You can see the split lines and overlap zone, and the outline of the splitting hoops.
|
|
|
|
|
|
|
Drag the point a to the left so that the split line above the point is clear of the wing. |
|
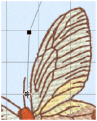
Drag the second point over the wing so that it is between the wing and the antenna, clear of any of the stitch points. |
|
There is a point that is level with the bottom of the body of the butterfly. Drag this point to the right so that it is in the middle of the space between the body and the lower right wing. |
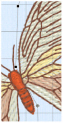
Notice that the split line between the wing and the body could be improved. Extra points can be added and adjusted to do this.
Note: Alternatively, in the main screen you could click Select All ![]() to select all of the split sections of the embroidery, then drag the complete embroidery to the left, so that both of the two blue butterflies are within the left hoop section. Then reset your split lines.
to select all of the split sections of the embroidery, then drag the complete embroidery to the left, so that both of the two blue butterflies are within the left hoop section. Then reset your split lines.
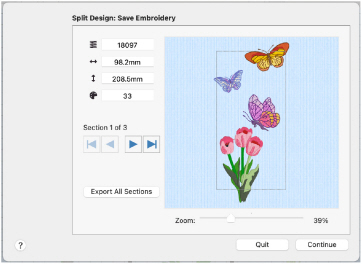
Note: The full rectangle of the baste alignment stitches (which are a medium gray) may not be visible when zoomed out. To see the alignment stitches clearly, zoom in and swipe to move around the preview.
The files are saved as the files ButterflyGarden_Exported_01 to ButterflyGarden_Exported_03. Creating a new folder makes it easier to find all the sections.
Note: When stitching out this split embroidery, stitch section 'Butterfly GardenExported_03' before 'Butterfly GardenExported_02'. Section 'Butterfly GardenExported_03' contains the right wing of the butterfly that was split, and it will look better if the part with the body of the butterfly is stitched after the wing. This should also successfully conceal the split.
Note: Cut out the template and attach the sections as a guide for positioning fabric within the hoop.
Note: The worksheets give the dimensions of the section, the number of stitches, information on the thread colors used and the Notes and Settings for the embroidery.