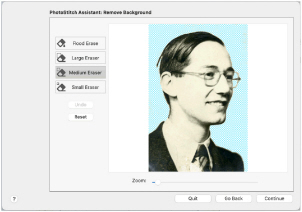
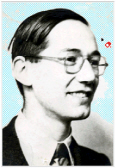
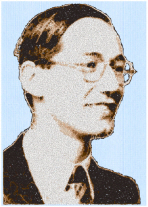
Use the Remove Background page of the PhotoStitch Assistant to remove the background from the photo, so as to emphasize the person’s face, or other subject.
Note: Best results may be obtained if the background is completely removed, leaving only the face itself. Removing heavily contrasting colors in the background brings out the subtle color variations in the person’s features.
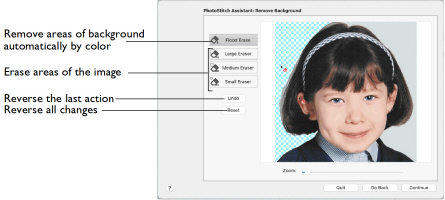
Flood Erase
Select Flood Erase
to remove sections of similarly colored background automatically.
Flood Erase looks for areas with a similar color shade, and replaces them with a transparent background.
-
Click Flood Erase

, then click on the areas of the picture that you want to remove.
Note: Use Flood Erase in conjunction with Undo on varied backgrounds such as a cloudy sky. A small change in the position of the click may remove desired parts of the picture along with the background.
Flood Erase works best on relatively evenly colored areas. Areas with gradations of colors can be removed in several pieces, but patterned areas may be easier to remove with the Large Eraser.
Note: Some backgrounds may be a similar color to the hair or skin of the person in the foreground. Draw a line around the person with the Small Eraser, then remove the background with Flood Erase.
Note: When Flood Erase is used to remove a very brightly colored background, for example a bright blue sky, there may be a colored edge around the subject of the picture. This can affect the final embroidery. Use the Small Eraser to carefully remove the colored edge.
Eraser
The Eraser removes any part of the image that it is used on, leaving a transparent background. Three sizes are available.
Note: Lift the mouse button or graphics tablet pen frequently when using one of the erasers. Then if you make a mistake, and need to Undo, you will not lose much work.
Large Eraser
Use the Large Eraser

to remove large areas of background, and to clean remaining fragments of background from a picture.
Note: Patterned backgrounds often contain pixels of widely varying colors, and a few of these may remain when the area has been cleaned with Flood Erase. Remove these with the Large Eraser.
Medium Eraser
Use the Medium Eraser

to clean relatively detailed areas.
Small Eraser
Use the Small Eraser

to remove fine details, or to draw a line to separate a desired area from an unwanted one.
Defining Areas with the Small Eraser
Open your chosen picture in the Remove Background page of the PhotoStitch Assistant, and start removing the background with Flood Erase.
|
|
|
|
If a desired area of the picture is removed, click Undo. Select the Small Eraser 
. |
Draw a line to separate the background area from the picture. You may need to do this in more than one place. |
Select Flood Erase again. Continue removing the background area with Flood Erase. Use Undo if required parts of the picture are removed. |
Repeat this process where other parts of the picture are the same color as the adjoining background.
Undo
Use Undo to reverse the last action.
Reset
Use Reset to reverse all changes made to the picture on the current assistant page. Changes made on previous pages are retained.
Zoom
Use the Zoom bar to change the view of the picture. Zoom in (drag the slider to the right) to magnify the view. Zoom out (drag the slider to the left) to shrink the view.
When zoomed in, use the scroll bars or swipe to move around.
Go Back
Return to the Rotate and Crop Picture page.
Continue
Go to the Design Size page.
Remove the Background from a Photo
-
In the Create window

of the Control Panel

click PhotoStitch Assistant
 > PhotoStitch into Hoop.
 -
The PhotoStitch Assistant opens at the Choose Embroidery Type page.
-
Ensure Color PhotoStitch Embroidery is selected, then click Continue. The Choose Picture page appears.
-
Click Select File, and browse to a photo. Click Open.
-
Click Continue and the Rotate and Crop Picture page appears.
-
No rotation or cropping are required, so click Continue and the Remove Background page appears.
-
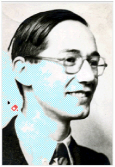
Click an area to the side of the picture. Flood Erase removes an area of the background, leaving small differently colored areas behind.
-
Continue using Flood Erase to roughly remove similarly colored areas. If need be, use Reset to start again.
-
Click a background area similar to the skin color. Part of the face may be removed, along with the background. Click Undo.
-
Use the Zoom bar to magnify the area where the skin and background are a similar color.
-
Select the Small Eraser
 and draw a line around this area, separating the skin from the background color.
 -
Zoom out to see the full picture again.
-
Roughly remove the rest of the background with Flood Erase
 .
. -
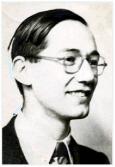
Click the Large Eraser
 , and clean the remaining specks from the background. The Medium Eraser
  is better for cleaning areas close to Jonathan’s head.
 -
Click Continue. The Design Size page appears.
-
Click through the rest of the PhotoStitch Assistant until the PhotoStitch Embroidery Options page appears.
-
If you can see specks in the background of the embroidery, click Go Back to return to the Remove Background page and zoom in to examine the picture closely. Use one of the erasers to remove any remaining flecks. Then click Continue until the PhotoStitch Embroidery Options page appears.
-
Click Done to finish, and place the embroidery in the work area.
The picture is loaded onto the Choose Picture page, with the name shown below the preview area.
Note: It is recommended to use a graphics tablet and pen, if available, for the Remove Background functions.
Flood Erase removes a particular color, and very similar colors.
Note: Undo reverses the last action, while Reset goes back to the original version of the picture.
If this does not happen the first time, try again nearby.

Lift the mouse button or graphics tablet pen frequently. Then if you make a mistake, and need to Undo, you will not lose much work.
Use the Zoom bar to zoom in and out while tidying up the outline.
Note: For a color PhotoStitch, a slightly rough outline will not affect the final embroidery, but specks of background may lead to ’stray stitches’.