View, Create and Adjust Appliqué Areas
An appliqué area is an area of appliqué fabric surrounded by a border. A fill may also be present.
Note: The appliqué features show how a fabric would be placed. They do not alter the stitches.
The appliqué fabric is shown under the design, as it would appear when stitched out. An unlimited number of appliqué areas may be added to a design.
Note: Ensure that the correct object is selected before adding appliqué. Use the FilmStrip and the arrow keys to step through the objects.
Change the Fabric in an Appliqué Design
-
Click Hoop
 in the toolbar, and in the Universal Hoop Group set the Hoop Size to 100mm x 100mm - Universal Square Hoop 1. Click OK.
 -
Choose File > New to open a new window.
-
Choose Edit > Insert > Insert SuperDesign.
-
Browse to the Appliqué Category, and the Climate 1 section.
-
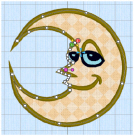
Select the second design, a Moon, and click Apply.

-
Close the Insert SuperDesigns dialog.
-
Near the top of the FilmStrip, click the Running Stitch Appliqué object.
-
In the toolbar, click Edit Points
 . The points for the appliqué area for the moon are highlighted.
 -
Drag one of the points. The shape of the fabric for the moon changes.
-
Control–click the fabric area and choose Properties in the pop-up menu.
-
Click the Appliqué tab, then click Select Fabric. The Appliqué Selection dialog opens.
-
In Appliqué Type, select Fabric.
-
Click Load Previously Saved Fabric

and in the Fabric viewer choose Squares 2 - 18.
-
Click OK three times to close all of the Appliqué properties. The fabric now has a zigzag handle
 .
. -
Drag the square zigzag fabric handle
 . The fabric for the moon moves.
Use the fabric handle to move the origin point (center of design) of a tiled fabric. -
Drag the round handle. The fabric for the moon rotates.
-
To change the fabric, Control–click the fabric area and choose Properties in the pop-up menu.
-
Click the Appliqué tab, then click Select Fabric.
-
In the Appliqué Selection dialog ensure that Fabric is selected as Appliqué Type, then click Load Previously Saved Fabric
 .
. -
In the fabric viewer, choose a different fabric and click OK three times to view the moon with the changed fabric.
Note: This handle  is only available for fabric tiles; you cannot rotate quick Appliqué or Pictures. SuperDesigns use "quick" fabrics - a colored texture that cannot be moved.
Note: The fabric rotates around the fabric handle (the origin point of the fabric tile).
Creating and Selecting Appliqué Areas
Appliqué areas are created in the same way as stitched fill areas.
Create an Appliqué Area
-
In the Create toolbar, ensure that the Line type is highlighted in blue (is selected).
-
Click Appliqué
 to select it.
 -
Click Options and choose Fill Area and Line to open the properties dialog.
-
In the Line tab, set the properties of the line.
-
Click Appliqué, and in the Appliqué tab select an Appliqué Method. See Appliqué.
-
Click Select Fabric, and choose a fabric for your appliqué area. See Appliqué Selection.
-
Click OK to close the Fill Area and Line dialog.
-
Select the Quick
 , Freehand
  or Point
  Create toolbar.
 -
Use one of the create tools in the selected Create toolbar to draw the appliqué area. See Creating Fills and Lines.
Note: If you use one of the QuickStitch™ tools you will need to load a background picture.
Select an Appliqué Area
-
Click Hoop
 in the toolbar, and in the Universal Hoop Group set the Hoop Size to 200mm x 200mm - Universal Square Hoop 3. Click OK.
 -
Choose File > New to open a new window.
-
Choose Edit > Insert > Insert SuperDesign.

-
Browse to the Appliqué Category, and the Climate 1 section.
-
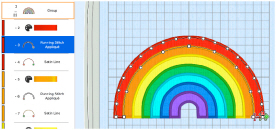
Select the first design in the third row, a rainbow, and click Apply.
-
Close the Insert SuperDesigns dialog.
-
Look at the FilmStrip. Each color change has a Running Stitch Appliqué entry below it. These are the appliqué areas in the design.
-
Control–click in the work area and choose Finish Box Select in the pop-up menu.
-
Click the Running Stitch Appliqué below the red thread at the top of the FilmStrip. The points for the red appliqué area in the rainbow are highlighted.
Note: You can move and rotate the fabric, and change its properties. See Change the Fabric in an Appliqué Design. -
Click the Running Stitch Appliqué below the orange thread further down the FilmStrip. The points for the orange appliqué area in the rainbow are now highlighted.
-
Select and adjust the other appliqué areas in the rainbow.