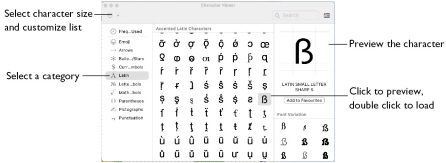
Use Emoji & Symbols to add emoji (smileys), symbols and the extra characters used in many languages, for example ß, that are not present on your keyboard.
-
Choose Edit > Emoji & Symbols (^⌘Space).
Add a Special Character to Your Text
-
Choose Edit > Emoji & Symbols.
-
In the Characters dialog, select a character category, e.g. Latin.
-
Click the desired character to select it.
The character is previewed.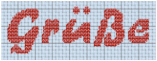
-
Double-click on the character to place it in the Letters text box.
-
Click Apply to place the lettering in the work area.
If needed, click the Expand ![]() button to view the large version of the dialog and select a character category.
button to view the large version of the dialog and select a character category.
Create Text for the Happy House Sampler
-
Choose File > New and in the Cross Stitch Design Assistant load the design /mySewnet/Samples/Cross Stitch/Krz/Line of buds for Happy House.krz.
-
Choose View > Grid > Every 5 Lines.
-
Select the Letter window

of the Control Panel

.
-
Click Fixed Font at the top of the Letter window.
-
Click the displayed font, and in the Font Viewer scroll down to the Modern category and select the font Sans Cross Narrow 7.
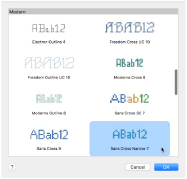
Note: The Fixed Font names include the type of stitches in the font, and the number at the end is the height in grid squares of the 'A' character in the font. Additionally, fonts that use more than one color will have 2C (two color) or 3C (three color) in the name. -
Click 'Sans Cross Narrow 7' in the Modern category to highlight it, then click OK.
-
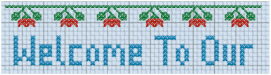
Click in the Letters box and enter 'Welcome To Our'.
-
Click Apply. The text appears on the design and it is automatically selected with Box Select.
-
Drag the selection so that the text is centered under the top border of buds, and so that the tops of the uppercase letters are two grid squares from the buds, and "W" is three squares from the left edge. The selection box will overlap the buds, but the buds will not be affected.
-
Click the displayed font, and in the Font Viewer select 'Sans Cross 9' in the Modern category. Click OK.
-
In the Letters box, delete the previous text, type 'Happy', and press Control–Return.
-
Then type 'House' so that the text is on two lines.
-
Click Apply and the text appears on the design, and it is automatically selected with Box Select. Notice that the text is blue, according to the color used to design the font.
-
Choose Edit < Undo.
-
In the Thread Colors box, click blue thread color and the Color Selection dialog appears.
-
Ensure that Robison-Anton Rayon 40 is selected as the Thread Range.
-
In the Find Thread text box, enter 2378. Select thread 2378 (Red). Click OK and the thread sample changes to red.
-
Click Apply.

-
Drag the selection to position the text centrally, with a gap of two grid squares under the 'Welcome To Our' line. Click outside the selection box to set the text in place.
-
The Box Select
 function is still selected, so drag a selection box around the word 'House'.
 -
Move the word 'House' exactly four squares up from its current position, so that the top of the 'H' is only one square below the 'y' of 'Happy'.
-
Click outside the text to deselect it and set it in place.
Note: Alternatively, set up the work area and create the line of buds as described in Place a Border of Buds for the Happy House Sampler.
Note: To add cross stitch designs to this sampler, see Add Designs to the Happy House Sampler.