Use the Project-in-the-Hoop Assistant to create an in-the-hoop design.
Open the Project-in-the-Hoop Assistant
-
In the Create window

of the Control Panel

click > Project-in-the-Hoop Assistant
 .
. -
Choose Assistants > Project-in-the-Hoop Assistant.
Use the Project-in-the-Hoop Assistant
-
In the Create window

of the Control Panel

click Project-in-the-Hoop Assistant
 . Alternatively, choose Assistants > Project-in-the-Hoop Assistant.
 -
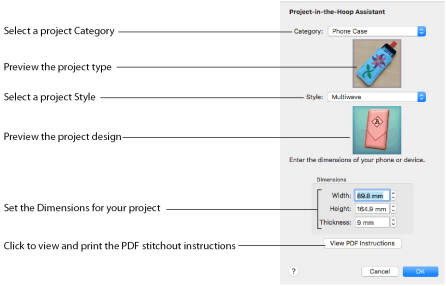
Select a design Category and a Style.
-
If required, enter the Dimensions of your project.
-
Click the View PDF Instructions button to view and print a copy of the PDF stitchout instructions.
-
After you click OK to select the project, read the instructions in the PDF, and view how the project is constructed in the Design Player
 .
.
-
Then make any desired customizations to the main design in the work area.
Note: Ensure that you change only the decorative embroidery, and not the construction stitching. Preserve the order of the sections of the project. -
Choose Edit > Previous Design (⌘←) and Edit > Next Design (⌘→) to step between the sections of the project, or use Reveal Groups
 to view the sections in the FilmStrip.
 -
Change the color of the construction stitching, and the decoration, to suit your fabric.
-
Choose File > Save to save your project, and then stitch it out in a suitable hoop, following the instructions.
Create a Phone Case Project
-
If required, choose File > New and load an empty work area.
-
Click the Hoop button
 and set the hoop size to 260mm x 200mm - Universal Large Hoop 3, and set Orientation to Natural. See Hoop Selection.
 -
Click OK to select the hoop.
-
In the Create window

of the Control Panel

click Project-in-the-Hoop Assistant
 . The assistant opens.
 -
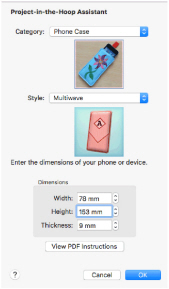
In the Category pop-up menu, choose Phone Case.
-
In the Style pop-up menu, choose Multiwave. The phone case style is displayed.
-
Click the View PDF Instructions button. A PDF of the instructions is displayed.
-
Scroll through the document to view the instructions, and if desired print or save a copy.
Note: To view the instructions again later, reopen the Assistant, choose the same Category, and click View PDF Instructions. -
Measure the phone, then enter the Width, Height and Thickness of the phone in the number boxes.
-
Click OK to load the project into the work area.
Note: The hoop is considerably larger than the design. You can use a smaller hoop. -
Click the Hoop button
 and set the hoop size to 240mm x 150mm - Universal Large Hoop 2, with Orientation set to Natural.
 -
Below the FilmStrip, click Reveal Groups
 .
.
Note: The project is created as a Group. Use Reveal Groups to customize part of it. -
Choose Edit > Next Design (⌘→) until the letter A embroidery is selected.
Note: The thread colors in the Color Select panel in the Design Panel indicate whether a gray structural section, or a red decorative section is selected. -
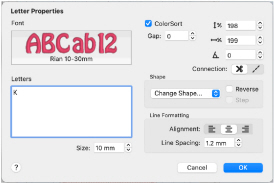
Control–click the A embroidery, and choose Edit Lettering in the context menu to view the Letter Properties dialog.
-
In the Letters text box, change the initial to that of the phone’s owner.
-
Click the Font, and in the font list scroll to the Modern Category.
-
Select the font Rian 10-30mm.
Note: To squeeze more letters into the space, you could select a smaller font, and adjust the lettering shape with the Handles menu. -
Click OK twice to close the Letter Properties dialog.
Note: The pink for the letter is too similar to the color of the other stitching. A darker color would work better. -
Open the Design window

of the Control Panel

.
-
In the Color Select, double-click the pink for the letter to open the Color Selection dialog.
-
Select a stronger color in the dialog, or use the Colors window
 .
. -
Click OK to view the changed color.
-
Choose Edit > Next Design (⌘→) or the FilmStrip again to select the red MultiWave Fill stitching in the Color Select area.
-
Control–click the stitching, and in the context menu choose MultiWave Fill, and MultiWave Fill 1.
Note: This is the fill for the bottom part of the phone case. -
In the MultiWave Fill properties dialog, select (check) Use Motifs, then click the Motif button.
-
In the Motif dialog, select a motif Category and Pattern.
-
Reduce the size of the motif to suit the small size of the phone case, then click OK twice to view your changes.
-
Control–click the stitching, and in the context menu choose MultiWave Fill, and MultiWave Fill 2 to select the fill for the top part of the phone case.
-
In the MultiWave Fill properties dialog, select (check) Use Motifs, then click the Motif button.
-
Select a motif Category and Pattern, and set the size as desired. Click OK twice to close.
-
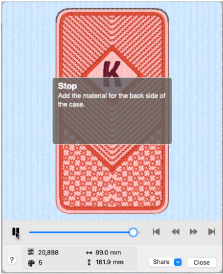
In the toolbar, click Design Player

.
-
Play through the design to see how it will be stitched out.
Note: You can also print a worksheet to view the structure of the project.
Choose File > Save to save your project, and File > Export to save it for your embroidery machine, then stitch it out.