Use the Pattern Fill dialog to set the properties on a pattern fill area.
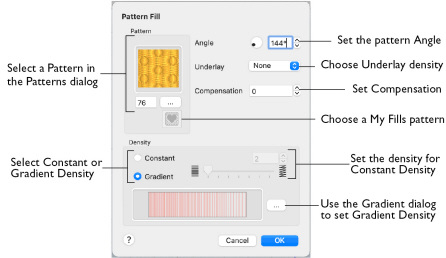
Pattern
Choose a fill pattern in the Pattern viewer. See Pattern.
Angle
The angle of the fill pattern, as shown by the rotational slider and number box. The thread is at a right angle to the fill pattern. You can set the Angle from 0 to 359 degrees.

Note: The fill angle also affects the orientation of a gradient fill.
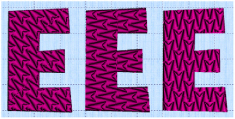
|
|
The example shows pattern number 56 from Litho font, Modern category, with the fill angle set to 315, 270 and 180 degrees. |
Underlay
Underlay is a low density fill that is perpendicular to the stitches of the actual fill area. It is useful for stabilizing large fill areas.
Note: Underlay stitches are not generated for areas using gradient density. However it can be selected, as you may change the area to constant density.
-
Choose None, Low, Medium or High density underlay from the pop-up menu.
Compensation
Compensation is used to make an area 'bolder' by increasing its relative size. The higher the number, the bolder the area appears. The initial setting is 0.
-
Click the arrows to set Compensation from 0 to 20, or enter a value in the number box.
Density
Constant density creates a uniform fill at the chosen density. Gradient density creates a fill with varying density or color.
Note: Embroidery on thick fabrics usually looks better with more stitch coverage (a low density setting). Choose a low value such as 2 or 3 for heavy knit fabrics, and a higher value such as 5 or 6 for a light material such as linen or satin.
-
Select between Constant and Gradient density.
Setting Constant Density
The lower the number, the closer together the stitches and the more stitches are produced. You can set Density from 2 to 40.
-
Select Constant, then use the slider or the number box to set the Density.
Setting Gradient Density
-
Select Gradient, then click the ellipsis button (3 dots) to open the Gradient dialog. See Gradient.
Change a Pattern Fill
-
Open the Pattern Fill dialog. See Pattern Fill.
-
Click the button with the ellipsis (three dots) to open the Pattern viewer.
-
Scroll through the Pattern categories, and click a pattern to select it.
-
Set the angle for the pattern.
-
Click OK to close the Pattern Fill dialog and view your changes.