ExpressDesign Assistant Examples
Create a Happy Sun Embroidery
-
If required, choose File > New.
-
Click the Hoop button
 and set the hoop size to 150mm x 150mm - Universal Square Hoop 2. See Hoop Selection.
 -

of the Control Panel

click ExpressDesign
 > ExpressDesign into Rectangle. The pointer changes to the draw rectangle pointer
  .
. -
Starting at the corner of a grid square, drag to draw a square that is ten by ten grid squares.
-
Release the mouse button. The Select ExpressDesign Method page of the ExpressDesign Assistant appears.
-
Ensure that Create Express Embroidery is selected.
-
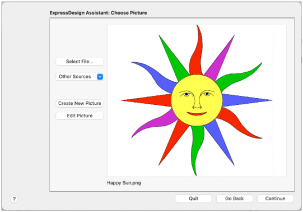
Click Continue. The Choose Picture page of the ExpressDesign Assistant appears.
-
Click Select File.
-
In the Open dialog, browse to the folder mySewnet/Samples/Embroidery/Pics.
-
Click 'Happy Sun.png', then click Open.
The picture is loaded onto the Choose Picture page, with its name shown below the preview area. -
Click Continue and the Rotate and Crop Picture page appears.
-
No rotation or adjustment of crop lines is required, so click Continue.
-
In the Design Size page ensure the width
 is set to 100mm.
Note: The height will automatically change proportionally. -
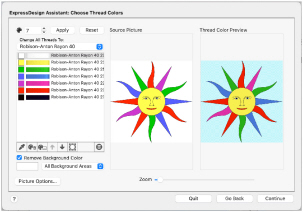
Click Continue. The Choose Thread Colors page appears.
-
Ensure the Remove Background Color checkbox is selected. The white background is removed.
-
Click the Picture Options button. In the Picture Options dialog, ensure that Expand Pixel-Thin Lines is selected in Black Lines.
-
In Area Sensitivity, ensure that the setting is Medium.
-
Click Close.
-
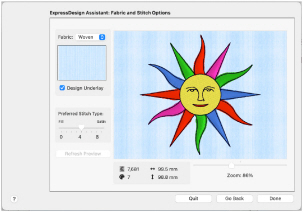
Click Continue and the Fabric and Stitch Options page appears.
-
Leave fabric as Woven.
-
Ensure that Design Underlay is selected.
-
Move the Preferred Stitch Type slider to 4. This will use fill for the sun’s face, and satin for the sun’s rays.
-
Click Refresh Preview to view the changes.
-
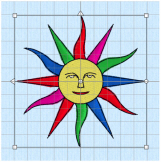
Click Done. The Happy Sun embroidery appears on the work area, where the rectangle was drawn.
Note: If the rectangle is wrong and you wish to try again, click Quit when the Choose Picture page of the ExpressDesign Assistant appears and return to step 3.
Create a Happy Sun Express Trace
-
If required, choose File > New.
-
Click the Hoop button
 and set the hoop size to 150mm x 150mm - Universal Square Hoop 2. See Hoop Selection.
 -

of the Control Panel

click ExpressDesign
 > ExpressDesign into Rectangle. The pointer changes to the draw rectangle pointer
  .
. -
Starting at the corner of a grid square, drag to draw a square that is seven by seven grid squares.
-
Release the mouse button. The Select ExpressDesign Method page of the ExpressDesign Assistant appears.
-
Select Create Express Trace.
-
Click Continue. The Choose Picture page of the ExpressDesign Assistant appears.
-
Click Select File.
-
In the Open dialog, browse to the folder mySewnet/Samples/Embroidery/Pics.
-
Click 'Happy Sun.png', then click Open.
-
Click Continue and the Rotate and Crop Picture page appears.
-
No rotation or adjustment of crop lines is required, so click Continue.
-
In the Design Size page ensure the width
 is set to about 70mm.
Note: The height will automatically change proportionally. -
Click Continue and the Outline Finder and Expander page appears.
-
Check that Find Outline is not selected. The picture has good outlines that can be used.
-
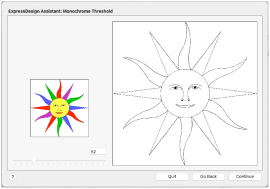
Click Continue and the Monochrome Threshold page appears.
-
Set the Monochrome Threshold to less than 52, so that only the outlines show in the preview.
-
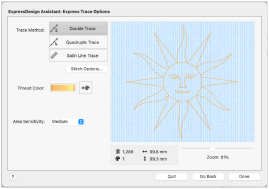
Click Continue and the Express Trace Options page appears.
-
Ensure Double Trace is selected.
• Double Trace traces lines in the picture with a combination of double stitch and running stitch.
• Quadruple Trace creates a bolder effect by using a combination of triple stitch and running stitch. -
Click the Thread Color button
 and set the thread color to Sulky Rayon 40 1124 (Sun Yellow), then click OK. The preview shows the traced embroidery in the chosen thread color.
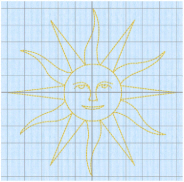
-
Click Done and the Happy Sun embroidery appears on the work area, where the rectangle was drawn.
Note: If the rectangle is wrong and you wish to try again, click Quit when the Choose Picture page of the ExpressDesign Assistant appears and return to step 3.
The picture is loaded onto the Choose Picture page, with its name shown below the preview area.
Create an Umbrella Border
-
If required, choose File > New.
-
Click the Hoop button
 and set the hoop size to 100mm x 100mm - Universal Square Hoop 1. See Hoop Selection.
 -
In the Create window

of the Control Panel

click ExpressDesign
 > ExpressDesign into Hoop. Alternatively, choose Assistants > ExpressDesign > ExpressDesign into Hoop. The Select ExpressDesign Method page of the ExpressDesign Assistant appears.
 -
Select Create Express Border.
-
Click Continue. The Choose Picture page of the ExpressDesign Assistant appears.
-
Click Select File.
-
In the Open dialog, browse to the folder mySewnet/Samples/Embroidery/Pics.
-
Click 'Umbrella.png', then click Open.
-
Click Continue and the Rotate and Crop Picture page appears.
-
Click Select All, then click Continue.
This will create a small margin around the embroidery, so that it does not touch the edge of the hoop area. -
The embroidery size is set by the size of the hoop, so in the Design Size page click Continue. The Monochrome Threshold page appears.
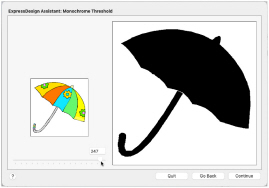
-
Set the Monochrome Threshold to 246 or more, so that all of the colored areas in the umbrella are black.
This creates a clearly defined shape to use for the border. If a lower number is used, extra lines may appear in the umbrella handle, or there may be gaps. -
Click Continue, and the Express Border Options page appears.
-
Ensure that Satin Line is selected as the Border Type.

-
Click Options. The Satin Line dialog appears.
-
Ensure that Width is set to 2.0mm, that Density is set to 4, and that Underlay is selected, then click OK.
-
Click the Thread Color button
 and set the thread color to Robison-Anton Rayon 40 2259 (Wild Pink).
 -
Click OK. The umbrella is now pink.
-
Ensure that Appliqué
 is selected.
 -
Click Select Fabric.
-
In the Quick Appliqué Colors section of the Appliqué Selection dialog, choose a color that will match the satin line for the border.
The picture is loaded onto the Choose Picture page, with its name shown below the preview area.