Add ribbon  to your design for use with the Ribbon Attachment, or place an indicator line for sewing with a standard ribbon foot. Choose a color and width in the Ribbon Selection dialog, then draw ribbon lines and shapes, or add a Ribbon Gallery design.
Note: Draw or place your line of ribbon within the green rectangle of the Ribbon Frame on the work area.
Draw lines of ribbon with Draw Freehand Line  or Draw Point Line
  , use Place Shape
  , or insert a design with Insert from Gallery
  . Ribbon is placed as a ribbon subdesign or added to an existing ribbon subdesign if one is selected.
Note: Use Edit Points  and Properties or the Context menu to make changes to the ribbon. See Edit Points.
Designing with Ribbon
Place your ribbon lines and designs to work with your Ribbon Attachment. Any ribbon should be placed within the Ribbon Frame (the green rectangle).
Note: The Ribbon Frame indicates the area accessible to the Ribbon Attachment within the selected hoop. To stitch ribbon in a wider area, select a larger hoop.
-
When designing with ribbon, use a continuous line where possible, and plan your start and end before placing your design. Ribbon designs cannot be split.
-
Avoid very sharp corners, and do not use loops smaller than 5mm in diameter.
-
You can stitch over another ribbon line, but not more than twice.
Note: Turnable hoops cannot be used with the Ribbon Attachment.
Draw a Line of Ribbon
-
In the Category section of the Embellish window
 , select Ribbon
.
-
Click Draw Freehand Line
 . The Ribbon Selection dialog opens.
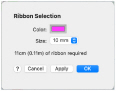
-
Select a ribbon color and size, then click OK to close the Ribbon Selection dialog.
The pointer changes to the pen pointer
.
-
Draw a line for the ribbon.
-
Control–click when you have placed the ribbon and select "Finish Draw Freehand Ribbon Line" from the Context menu.
-
To change the ribbon later, use Edit Points
 and Properties. See Edit Points.
Place Points for a Line of Ribbon
-
In the Category section of the Embellish window
 , select Ribbon
.
-
Click Draw Point Line
 . The Ribbon Selection dialog opens.
 -
Select a ribbon color and size, then click OK to close the Ribbon Selection dialog.
The pointer changes to the Point pointer
.
-
Click to place points for a line for the ribbon.
-
Control–click when you have placed the ribbon and select "Finish placing line" from the Context menu.
Note: Use Edit Points  and Properties or the Context menu to make changes to the ribbon afterwards. See Edit Points.
Draw a Ribbon Shape
-
In the Category section of the Embellish window
 , select Ribbon
.
-
Click the displayed shape, and in the popup list select a shape.
-
Click Place Shape

. The Ribbon Selection dialog appears.
-
Select a ribbon color and width, then click OK to close the Ribbon Selection dialog. The shape is shown on the work area.
-
Drag one of the corner handles to enlarge or shrink the shape.
Note: Hold down Shift to retain the original proportions. Hold down Option to resize from the center.
-
Rotate the shape with the circular rotate handle on the right.
-
Use the triangular flip handles on the left and top to mirror the shape horizontally or vertically.
-
Move the pointer over the shape. The pointer changes to the move pointer

.
-
Drag the shape to the desired position.
Note: To change the ribbon later, use Edit Points and Properties. See Edit Points.