Use the Pattern area to select the desired pattern category and number for fill a area.

Selecting a Pattern
The first pattern in a Category is selected each time a new Category is shown.
-
Scroll through the pattern Categories, then select a pattern.
Note: To use a Pattern from those you have imported in mySewnet™ Digitizing, select a My Patterns category. -
Enter a Pattern number directly in the Pattern box.
For more information, see Fill and Satin Patterns.
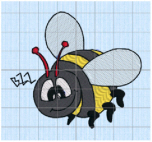
Add a Pattern to a Bumblebee Stripe
-
If required, choose File > New.
-
Choose Edit > Insert > Insert Design.
-
Browse to mySewnet/Samples/Stitch Editor/Stitch and load the 'Bumblebee 2' embroidery.
-
Select the Object
 window of the Control Panel
  . The pointer changes to the Object Select
  pointer.
 -
Move the pointer until the lower part of the middle yellow stripe on the bumblebee is highlighted, then click to select it.
-
Hold down Command and click to select the upper part of the yellow stripe.
Note: The points defining most of the striped areas appear, together with the colored fill pattern origin marker, and start
  and end
  points.
The front and back stripes are too small to show a pattern, therefore do not select them. -
In Edit Properties, click the Properties button. The Pattern Fill properties dialog appears.
Note: The Pattern Fill properties dialog enables you to set the properties for the pattern fill. -
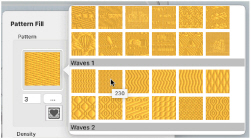
In the Pattern Fill dialog, click the ellipsis (3 dots) button to view the fill patterns.
-
In the patterns viewer, the fill category is currently set to Standard 1. Scroll down to the 'Waves 1' category.
-
Click the pattern sample in row 1, column 2. The pattern number changes to 230.
-
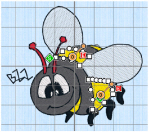
Click OK to see the new pattern in the bumblebee stripe.
-
Click outside the bumblebee to see the pattern clearly.
Note: All of the icons are unavailable (dimmed) as no area of stitches is selected.
Note: Patterns may also be selected directly by entering the desired pattern number in the Pattern box.