Use Insert Point Cutwork Line  to place points to define a line to be cut using cutwork needles. Create two or four needle lines automatically, with secure points and stabilizing lines according to the settings in Cutwork Options.
Select Insert Point Cutwork Line
-
In the Modify
 window of the Control Panel
, click Insert Point Cutwork Line
 .
. -
Choose Edit > Insert > Insert Point Cutwork Line.
Cut out a Shape with Insert Point Cutwork Line
-
Open an embroidery with a fill area.
-
In the Modify

window of the Control Panel

, click Insert Point Cutwork Line

. The pointer changes to the Point pointer

.
-
Click to place a series of points for the line.
-
Hold down Shift and click to place a point. The point is square, and the line leading to it is straight.
-
Move the pointer over one of the nodes on the line. The pointer changes to the Move Node pointer

. Adjust the node as desired.
-
Place as many points as desired.
-
Press Return or double-click to complete the cutwork shape. The area is closed automatically with a straight line between the last point position and the start position.
-
Draw as many more cutwork shapes as desired.
-
Control–click and choose Finish Insert Point Cutwork Line to deselect.
Note: As you click the fourth point on the line, the line becomes curved. As you place more points the line adjusts itself. Just carry on, you can adjust it afterwards.
Note: When the Move Node pointer is active you can adjust existing nodes. You can also use Shift–click to change the nodes to square nodes.
Note: If you click while the Point pointer

is active, another point is added to the line.
Note: If the desired line is not achieved when created initially, either redo the line or select and move the stitch points you wish to change.
Note: The points for the cutwork needle and stabilizing lines are inserted automatically, along the line that you placed.
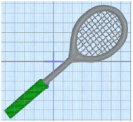
Cutwork Racket
-
Choose File > New to open a new window.
-
Click Hoop

in the toolbar.
-
In the Universal Hoop Group, set the Hoop Size to 100mm x 100mm - Universal Standard Hoop 1. Click OK.
-
Choose Edit > Insert > Insert Design.
-
In the folder mySewnet/Samples/Stitch Editor/Stitch, open the embroidery Racket.vp4.
-
Ensure that the Design window
 of the Control Panel
  is selected.
 -
Look at the Color Select area. There are two thread colors in the worksheet.
-
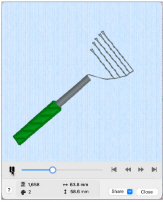
In the toolbar, click Design Player

.
-
Use the Play button

at the bottom left to start playing through the stitches in the embroidery as if they were being stitched. The handle and shaft of the racket are stitched out before the strings and head.
Note: This enables a cutwork line to be placed before the strings and head. -
Close the Design Player.
-
In the Control Strip, click Draw All Stitches

.
-
In the Draw Range, slowly move the slider for the End (right) towards the left.
As you move the slider, some of the stitches forming the head of the racket and the strings are hidden. -
Click Ghost Mode
 .
. -
Move the End slider to the left to where the stitches move into the strings for the racket, approximately stitch number 504.
Note: If needed, click the arrows on the number boxes below the slider bar to show or hide stitches one at a time.
This is where the cutwork line will be inserted.
Note: Stitch numbers are given as guides only. It is more important to ensure that the correct stitches are hidden or left showing than to follow the exact stitch numbers. -
Click the Modify
 window of the Control Panel
  .
. -
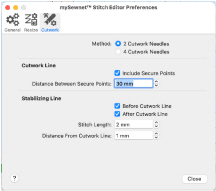
In the Cutwork area, click the Options button. The Cutwork page of the Preferences dialog appears.
-
In Cutwork Line ensure that Include Secure Points is selected (checked), and that Distance Between Secure Points is set to 30mm.
Note: Secure Points prevent the fabric from lifting up while it is being cut. The secure points are trimmed away, and the fabric removed, after the cutwork line has been completed, and before washable stabilizer (or reverse appliqué fabric) is placed. -
In Stabilizing Line ensure that both Before Cutwork Line and After Cutwork Line are selected (checked).
-
Ensure that Stitch Length is set to 2mm, and set Distance from Cutwork Line to 1mm.
Note: The line cut through the fabric may have a sharper edge if a stabilizing line of stitching is placed before the cutwork line. This can prevent the fabric from shifting when the cutting needle moves in and out. -
Click Close to save your settings.
-
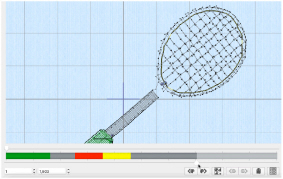
In the toolbar, click 2D View with Stitch Points
 . The individual stitches are now visible.
 -
Click Zoom to Rectangle
 . The pointer changes to the zoom pointer
  .
. -
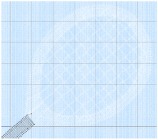
Drag to draw a rectangle around the racket head, then release the mouse button to zoom in.
-
In the Cutwork area of the Modify panel, click Point Cutwork Line
 . The pointer changes to the Point pointer
  .
. -
Click to place points around the inside edge of the racket head, a short distance from the edge of the satin stitch.
Note: As you click the third point on the line, the line becomes closed (it becomes a loop). As you place more points the line adjusts itself.
The line may ’swing’ while you place points. Continue, and you can adjust it afterwards if required.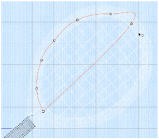
-
Place points until you are near to your starting point, then Control–click and choose Finish Point Cutwork Line to finish.
-
Click the Design window
 of the Control Panel
  .
. -
Look at the Color Select area. There are now five thread colors in the color worksheet.
-
Ensure that Ghost Mode
 is still selected.
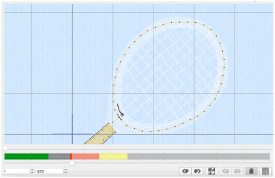
-
Move the End (right) slider on the Draw Range to the end of the gray stitching, approximately stitch number 570.
Note: This includes the first stabilizing line. -
Hover the mouse pointer over the first gray thread in the Color Worksheet. The thread in the embroidery is highlighted, and a tooltip displays the name of the thread (Robison-Anton Rayon 40, 2585 Banner Gray).
-
Hover the mouse pointer over the colors below, in turn.
-
Choose File > Save.
-
Browse to the folder mySewnet/MyDesigns. In the Save As box, change the name to 'RacketCutwork', then click Save.
Note: The preferred file format for saving embroideries is .vp4, as this will preserve background and appliqué information, thread color information and notes.
When inserting washable stabilizer (or appliqué fabric), insert it after needle color 2 - red, and before the second stabilizing line. The stitch line will then hold the stabilizer or fabric in place.
When the racket embroidery has been stitched out, wash the fabric to remove the washable stabilizer that the racket strings were stitched on.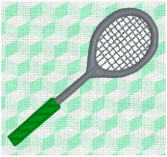
-
Click Draw All Stitches

.
-
Ensure that Ghost Mode
 is not selected.
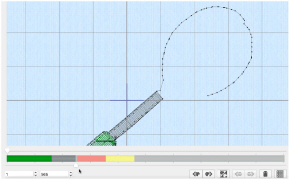
-
Ensure that 2D View with Stitch Points

is selected.
-
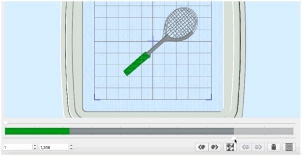
Move the slider on the Zoom Slider to zoom out until you can see the top of the green for the racket handle.
-
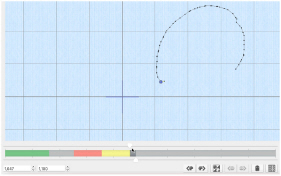
Move the End (right) slider on the Draw Range to the beginning of the racket shaft stitching, approximately stitch number 372.
-
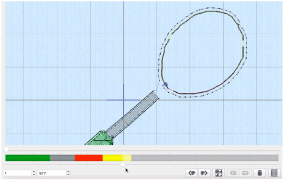
Slowly move the End slider on the Draw Range to the right. The shaft of the racket is drawn.
-
Move the slider further to the right. A circle is drawn. This is the stabilizing line stitched before the cutwork line is placed.
-
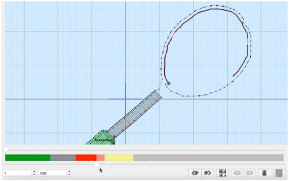
Move the slider again to the right. The first circular line is completed, and a second heavier circular line is placed within the first. This is the line for the first cutwork needle (the red in the color worksheet).
Note: The closely spaced (0.3mm) needle points are shown as a heavy line. The secure points (gaps) are shown as a thin red line. -
Move the slider further still to the right. A second cutwork line (the yellow in the color worksheet) is placed directly on top of the first.
Note: The best way to detect the added line is that the lines in the gaps for the secure points change from red to yellow.
You could also see the changes by deselecting (unchecking) the check box next to the red in the color worksheet after drawing the yellow (first) cutwork line. The red cut line will disappear. -
Move the Draw Range slider further to the right, to the end of the yellow color on the Control Strip.
-
Drag the Start (left) slider to the right to the last of the yellow cutwork line stitches, to meet the other slider.
-
Move the End (right) slider to the right again to draw the second stabilizing line.
-
Drag the Start (left) slider back to the start point to view all of the stitching and the cutwork lines.
-
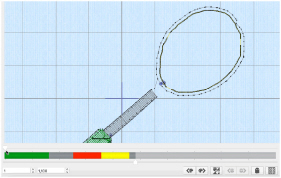
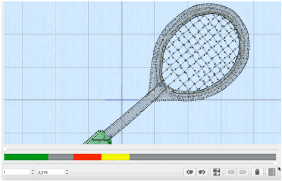
Move the End (right) slider to the right. The mesh for the racket strings is displayed.
-
Finally, move the slider the rest of the way, and the satin for the racket head is placed over the stabilizing and cutwork lines.
Note: The Draw Range enables you to insert stitches (or in this case a cutwork line) into a design. However, to work accurately you need to be able to see where the stitches after the cutwork line will be placed.
The stitches that were hidden are now white.
Note: With 2 needles, a bladed needle set at one angle is used to cut around the shape, and then the second needle travels around the shape cutting at a different angle.
4 Cutwork Needles is a little more precise, and is recommended for delicate fabrics, but takes longer to complete the cutwork process. In this design the cutwork line will be covered by a satin border, therefore it is not necessary to use four needles.
Note: A stabilizing line placed after the cutwork line may also add security. Stabilizing lines may not always be suitable when embroidering on delicate fabrics, or if you are simply cutting out a shape.
Note: The points for the cutwork needle lines and the stabilizing lines are inserted automatically.
The stitch points for the cutwork lines are very close together (0.3mm).
The gaps in this line represent the secure points.
Surrounding this cutwork line are the more widely spaced points for the two stabilizing lines. (As the points for the two cutwork lines and the two stabilizing lines are placed on top of each other, you cannot see the separate lines.)
Note: The gray for the racket shaft and head is now in two parts, with the bright red and yellow for the Inspira Cutwork needles in between.
The bright red is the cutwork line for Inspira Cutwork Needle 1, and the bright yellow is for Inspira Cutwork Needle 2. The satin of the racket head uses Banner Gray.
View Cutwork Stitching Order in Detail
Note: Use the cutwork embroidery you created in the exercise above, or use the design mySewnet/Samples/Stitch Editor/Stitch/RacketCutwork.