Use Border Shape ![]() to draw an outline with the selected border shape, using an internal, external or overlay border or appliqué. Drag the chosen shape to the desired size and position.
to draw an outline with the selected border shape, using an internal, external or overlay border or appliqué. Drag the chosen shape to the desired size and position.
Draw a Border Shape
-
If required, choose File > New.
-
Load an embroidery.
-
Select the Border
 window of the Control Panel
  .
. -
Select a Stitch Type, and set the Options for the border line in the properties dialog for the stitch type.
-
If desired, click Add Appliqué
 , select an appliqué fabric
and click the Options button to set the appliqué type.
-
In the Border / Appliqué section, choose a border or appliqué type from the pop-up menu.
-
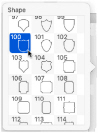
Click the Shape button and choose a Shape from the pop-up menu.
-
Click Draw Border Shape
 to select shape drawing.
 -
Drag over the embroidery on the work area to draw a rectangle that sets the size of the shape. Hold down Shift as you drag to draw proportionally. Hold down the Option key to draw from the center.
Note: When drawing shapes with sharp points, it is recommended to hold down Shift so that the shape is perfectly in proportion. -
Release the mouse to draw the shape. The shape is shown as a dashed line, with handles to resize, flip and rotate the it. The border may extend beyond the edge of the hoop.
-
Drag inside the border to move it, and resize the border with the handles on the corners, using Shift to keep the proportions. Use the circular rotate handle on the right to rotate the border, and use the triangular flip handles on the left and top to mirror the border horizontally or vertically.
Note: Click outside the selection to make a new selection. -
Click Create External Border
 to create the border.
Note: Use Control–click to deselect Finish Insert Border / Appliqué Shape and cancel without creating a border. -
In the Design
 window of the Control Panel, change the border color to the desired color.

Note: You could cut this badge out automatically by using Border Embroidery to add a cutwork line around the outside of the badge. See Border Embroidery.
Cut a Heart Border Shape from Lace
-
If required, choose File > New.
-
Click Hoop
 and from the Universal Hoop Group, set the Hoop Size to 240mm x 150mm - Universal Large Hoop 2. Set the Orientation to Rotated. Click OK.
 -
Choose Edit > Insert > Insert Design and in the folder mySewnet/Samples/Stitch Editor/Stitch load the 'Curly Lace' embroidery.
-
Choose mySewnet Stitch Editor > Preferences. In the General window, ensure Grid Size is 5mm and click Close to close the dialog.
-
Choose View > Grid > Grid Numbered Full. This is so there are grid numbers along the right and lower sides of the stitch area.
-
Click Invert Visible Color Blocks
 to hide the stitches of the lace.
 -
Ensure Ghost Mode
 is on, so that a pale version of the stitches is shown.
 -
Select the Border
 window of the Control Panel
  .
. -
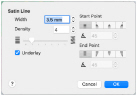
In Stitch Type select Satin Line

.
-
In the Satin Line dialog, set the Width to 3.5mm and the Density to 4.
-
Ensure Underlay is selected (checked) and click OK.
-
In the Appliqué Options dialog ensure that Running Stitch Length is set to 2.0mm and Double Stitch Length is set to 2.0mm.
-
Click OK to close the Appliqué Options dialog.
-
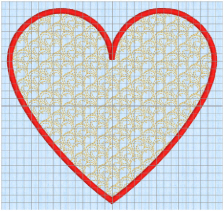
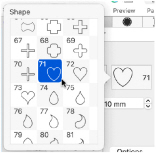
In the Shape pop-up menu, choose shape 71, the first heart shape. If necessary, use the scroll bar at the side of the list to find the shape.
-
Hold down the Shift key. This will force the shape to be proportional.
-
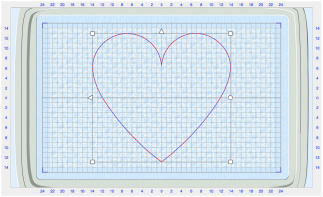
Drag diagonally across the hoop to draw a box from upper grid line 13 to lower grid line 13, then release the mouse button. The heart shape is shown on the work area in a selection box.
-
If the heart shape is out of the hoop on one side, drag inside the shape to ensure it is entirely within the hoop.
-
In the Modify
 window, click Create External Border
  . A lace embroidery with a heart-shaped border is created.
 -
In the Design
 window of the Control Panel, click the border thread color (the color at the bottom of the Color Select area) and in the Color Selection dialog set the Thread Range to Sulky Rayon 40, and browse for thread number 1246 (Orange Flame) in the list or type 1246 in the Find Thread box and select the color. Click OK to close the Color Selection box. The heart border is now red.
 -
In the Design Select area, select the second design (the lace design outside the heart), and click Select All Visible
 .
. -
Choose Edit > Delete to remove this lace design.
-
Save the embroidery as Lace Heart.vp4.
Note: Hiding the stitches and using Ghost Mode will make it easier to see where to draw the box for the Border Shape.
Note: Although the stitches are hidden, the Border and Appliqué functions will still affect all stitches in the embroidery. If desired, to see stitches more easily, use the Draw Range slider bar on the Control Strip to change the stitches displayed while adjusting the border shape.