-
In mySewnet™ Embroidery, open the Letter window
 , click the Font Manager
  button, then click the QuickFont button
  . Alternatively, click the mySewnet™ QuickFont icon
  in the Launchpad, or double-click the mySewnet™ QuickFont icon
  in the Finder.
 -
In the Font pop-up menu choose the font Lucida Grande.
The previews show the appearance of the 'ABC', ’abc’ and '123' characters in the font. -
Ensure the Typeface is set to Regular.
-
If you are creating a font for use in mySewnet™ Embroidery, choose ’For using in my mySewnet Software’.
-
Select a character set:
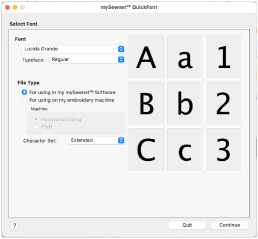
• If you are using QuickFont for mySewnet™ Embroidery, ensure that Extended is set as the Character Set.
• If you are creating a font for a HUSQVARNA VIKING® embroidery machine, ensure that Western 1 is set as the Character Set.
• If you are creating a font for a PFAFF® embroidery machine, ensure that Western 4 is set as the Character Set.
Note: These character sets are appropriate for general English text, with letters, numbers and some punctuation. -
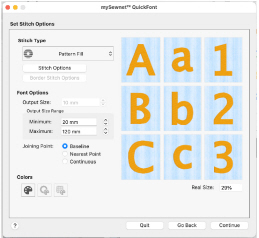
Click Continue and the Set Stitch Options page appears.
-
Set the Stitch Type to Pattern Fill
 . The previews now show the pattern fill, and the Output Size and Output Size Range values change, as Pattern Fill is suitable for larger letter sizes than the default Satin.
 -
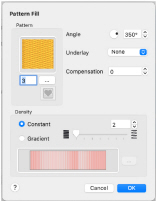
Click the Stitch Options button and the Pattern Fill dialog appears.
-
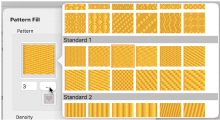
Click the Patterns button (the button with three dots) to choose a pattern for the fill.
-
In the Pattern viewer ensure the Pattern is set to 3 from the Standard 1 category.
-
In the Pattern Fill dialog, ensure the Density is set to Constant, and that the value is set to 2.
-
Click OK to close the dialog.
-
Click the Fill Thread Color button

and the Color Selection dialog appears.
-
Ensure the Thread Range is set to Robison-Anton Rayon 40.
-
Click in the Find Thread box and enter '2409'. Thread color 2409 (Yellow Mist) is found in the list.
-
Select the thread, and then click OK. The previews are updated with the new thread color.
-
Ensure the Joining Point is set to Baseline, which is the recommended setting for most lettering.
Note: Nearest Point is recommended for faster stitchout of small fonts, where connection stitches will be left untrimmed. Continuous is used for Script fonts where the lowercase letters are joined.
The Joining Point options are only available when creating a font for use in mySewnet™ Embroidery. They are not accessible when creating a machine font. -
Click Continue. The font is generated, and the Output Options page appears.
-
Use Next and Previous to preview the other letters in the font.
-
Leave the Font Name unchanged.
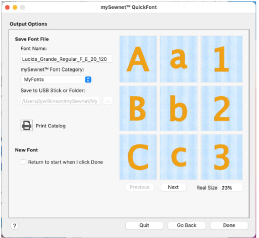
Note: The Font Name is automatically generated to show the TrueType® font name, then the typeface (here Regular), then the Stitch Type (F for Pattern Fill), then the Character Set (here E for Extended), then the minimum and maximum recommended sizes in millimeters (or output size for a machine font). Other letter combinations are used for different style and stitch type choices. -
If you are creating a font in QuickFont for use in mySewnet™ Embroidery, leave the Category as My Fonts. This will save the font to the My Fonts folder on your computer.
-
If you are creating a font for use on a machine, save the font to the My Designs folder on your computer (the default location), or to a USB embroidery stick.
-
If desired, click Print Catalog to print a reference sheet that shows the font details and the characters in the new font.
-
Click Done to close QuickFont.
The Select Font page appears.
If you are creating a font for a machine, select ’For using on my embroidery machine’, and choose your machine brand.
Note: The pictures here illustrate using QuickFont to create a font for mySewnet™ Embroidery.
Note: To use the font in mySewnet™ Embroidery, in the Font viewer, browse to the My Fonts Category. The font Lucida_Grande_regular_F_E_20_120 is previewed in the font display. The Font viewer automatically detects and previews any new fonts you add to My Fonts, and the font can be used in the same way as the system fonts.