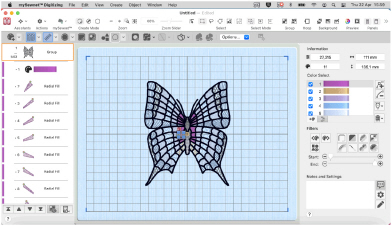
Welcome to mySewnet™ Digitizing
Use mySewnet™ Digitizing to create beautiful embroideries on your computer.
To get started with mySewnet™ Digitizing, open it and create embroideries using the ExpressDesign Assistant or Quick Create from Background to automatically create designs from a picture, or design over a picture with the Quick Create, Freehand and Point features. Choose stitch line and fill types for your design.
ExpressDesign Assistant
mySewnet™ Digitizing includes the ExpressDesign Assistant. Automatically create embroideries from a picture to fit the current hoop, or a selected area. Choose from three design types:
|
Quick Embroidery |
Quick Trace |
Quick Border |
|
|
|
|
|
Create a standard embroidery using satin, fill areas and outlining. |
Trace outlines in a picture to create, for example, redwork, quilt stencils and so on. |
Create stitch lines or appliqué around the edges of solid color areas in the picture. |

Quick Create and Shape Features
Quick Create from Background, QuickStitch™ and QuickTrace are alternatives to the ExpressDesign Assistant for creating sections of your design.
With Quick Create from Background automatically create a design from the lines in the background vector image.
With QuickStitch™, click in an area and stitches are produced automatically in an instant! Choose to embellish your designs with motifs, running, double or triple outline stitches, motif lines, borders with any combination of straight lines and curves or appliqué.
The QuickTrace feature automatically creates stitches that follow a continuous line. Create a Double trace ![]() , Quadruple trace
, Quadruple trace ![]() , Satin line
, Satin line ![]() or Motif line
or Motif line ![]() trace.
trace.
Also in Quick Create, create one of 120 shapes automatically as a fill area or line.
Freehand and Point Create Features
The Freehand and Point Create features allow you to work with your stitches in detail. Draw an outline, place points, or draw Bezier curves around an area of the picture and the stitches appear with your choice of pattern. Include a satin stitch or other line border if you wish, and set the angle of stitching to any degree. Insert holes where you choose.
Choose Satin Column ![]() (including over 250 patterns, and multigradient and multicolor gradient options for color blending), Satin Areas
(including over 250 patterns, and multigradient and multicolor gradient options for color blending), Satin Areas ![]() or constant width Satin Lines
or constant width Satin Lines ![]() and emboss them with needle point highlights. Create Feathered Satin
and emboss them with needle point highlights. Create Feathered Satin ![]() and texture either or both edges for special embroidery effects on fur or flowers. Create columns of Tapered Motifs
and texture either or both edges for special embroidery effects on fur or flowers. Create columns of Tapered Motifs ![]() .
.
Make cutwork designs easily with Richelieu Bars ![]() . Use other features such as Double Zigzag
. Use other features such as Double Zigzag ![]() stitch, Crosshatch Fill
stitch, Crosshatch Fill ![]() and Curved Crosshatch Fill
and Curved Crosshatch Fill ![]() to create free-standing lace.
to create free-standing lace.
Add individual stitches in straight or curved lines of Running, Double and Triple Stitch from 1 to 12mm.
Design Choices
Adjust designs using easy editing features: Navigate around the design with the Filmstrip, change easily between lines, fills, stitch types and patterns and so much more.
Fill patterns and techniques are amazing – choose from over 250 fill patterns ![]() , or make your own. Emboss patterned fill or satin areas, or satin columns, with personal highlights. Use single gradient density to produce beautiful shading effects, and multicolor gradient density to produce gradual shimmering color changes.
, or make your own. Emboss patterned fill or satin areas, or satin columns, with personal highlights. Use single gradient density to produce beautiful shading effects, and multicolor gradient density to produce gradual shimmering color changes.
Beautiful fill types include Radial ![]() , Spiral
, Spiral ![]() , Shape
, Shape ![]() with 120 shape options and motif options, QuiltStipple
with 120 shape options and motif options, QuiltStipple ![]() , Contour
, Contour ![]() , Crosshatch
, Crosshatch ![]() , Echo
, Echo ![]() and MultiWave
and MultiWave ![]() Fill. Curved Crosshatch Fill
Fill. Curved Crosshatch Fill  provides wonderful intersecting patterns for three-dimensional effects.
Choose from machine stitch Motifs or Universal Motifs such as the beautiful Hand Stitches for Motif Fill areas. You can create your own motifs in mySewnet™ Draw & Paint!
Open mySewnet™ Digitizing by clicking its icon in the Launchpad ![]() , or by double-clicking its icon
, or by double-clicking its icon ![]() in the Finder. The mySewnet™ Digitizing work area appears.
in the Finder. The mySewnet™ Digitizing work area appears.
Note: You can also open a design file (.edo) document in mySewnet™ Digitizing by linking from mySewnet™ Embroidery.
Further Information
Reference Guide
The Reference Guide shows how to start the app and provides a quick tour of the main screen. The Reference Guide is supplied in PDF format ![]() , ready for printing and contains full reference information.
, ready for printing and contains full reference information.
Help
The integrated help contains full reference information. Click the Help button  . Where available, a help topic appears that is relevant to the selected item. Alternatively, use the Help menu.
Viewing and Printing PDF Guides
To find all the Reference Guides for your mySewnet™ Embroidery Software, go to the mySewnet™ Guides page, linked to from download.mysewnet.com. Select the desired PDF guide.
Note: To view and print the PDF Guides, you may use Preview which is included in your Mac® OS.
Readme
The most up-to-date details about the mySewnet™ Embroidery Software are in the Readme.rtf file available when you install your mySewnet™ Embroidery Software.
Sample Files
Samples are provided for your use. Download the sample files from the Downloads page: download.mysewnet.com. Copy the samples folder to the folder of your choice.
Note: For the exercises in this manual, the mySewnet folder is used.