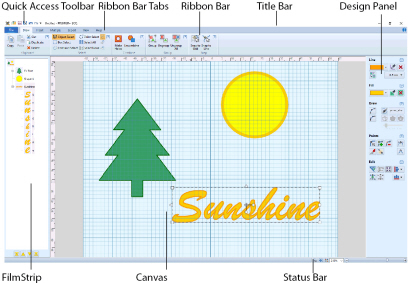
PREMIER+ ECQ™ Overview
When you start PREMIER+ ECQ™  you can create a new design, or Open or Insert an existing design.
Drawing
-
Start PREMIER+ ECQ™
 . It opens at the Draw tab.
 -
Click Point Draw
 .
. -
Place points to create a rough circle.
-
To finish, place the final point on top of the first point.
-
Place points in a line, and then double-click. A line is created.
-
Right-click and choose Finish Point Draw.
-
Click outside the line you just drew.
-
Click the Line color in the Design Panel and choose a new outline color from the palette.
-
Click the Fill color in the Design Panel and choose a new fill color from the palette.
-
Click Bezier Draw
 .
. -
Click and drag to draw a shape with a Bezier line.
-
To complete the shape, click to place the final Bezier point on top of the first point.
-
Right-click and choose Finish Bezier Draw.
-
Note the colors in the Design Panel, then click to select the first shape that you drew. The colors change back to the first set.
-
Click the Line color in the Design Panel. You can now choose a different outline color.
-
Click Swap Colors
 .
. -
Click Edit Points
 to show the points in the selected shape.
 -
Then use Insert Points
 and Delete Points
  to add and remove points from your selected shape.
 -
Click Knife
 .
. -
Draw a line straight across the shape that you created with Point Draw
 .
. -
Click Object Select
 , then click on one of the cut lines in the canvas. It is surrounded by a selection box.
 -
Drag the box a short distance away from the other line.
-
In the Design Panel, click Join
 . There are round handles on all of the open lines in your design.
 -
Where you dragged the two lines apart, click one handle on the section of cut line. The handle is colored orange.
-
Click the other handle for that section. The lines join.
-
Join the other two handles.
-
Click Edit Points
 , then click the shape that you created with Bezier lines.
 -
Click Convert Points to Corner
 , and click one of the points. It changes to a Bezier corner point.
 -
Then click Convert Points to Curve
 , and click the point to change it back.
 -
Use Select All
 followed by Delete
  to clear the canvas.
 -
Click the Insert tab.
-
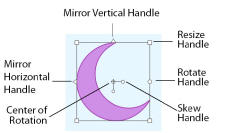
In the Shape drop-down list select shape 30, a crescent.
-
Click Insert Shape
 .
. -
Use the Mirror Vertical and Mirror Horizontal handles to flip the shape.
-
Move the Center of Rotation, and then rotate using the Rotate handle.
You can also rotate by set amounts with Rotate 45 and Transform
  .
. -
Drag the lower Skew handle to skew the crescent horizontally, then skew it vertically with the other skew handle.
-
Right-click on the crescent and Delete
 it.
it. -
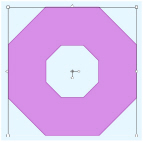
In the Shape drop-down list select shape 8, an octagon.
-
Click Insert Shape
 .
. -
Hold down the Ctrl and Shift keys, then drag the corner of the selection box to make the octagon larger.
-
Click Insert Shape
 again to place a second octagon on top of the first.
 -
Click the Draw tab, then click Box Select
 , and drag to select both shapes.
 -
Click Make Holes
 . The smaller octagon is now a hole cut in the larger one.
 -
With the octagon selected, click Uncombine
 .
.
There are two octagon shapes again. -
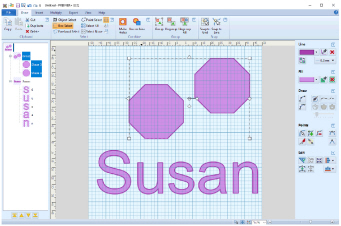
Click Object Select
 , then click to select the larger octagon.
 -
Hold down the Ctrl and Shift keys, then drag the corner of the selection box to reduce the size of the larger octagon.
-
Drag it away from the other octagon.
-
Click the Insert tab, then click inside the Lettering text box.
-
Enter a name in the text box.
-
Click Insert Lettering
 . The name is placed on the canvas.
 -
Move the lettering out of the way of the two octagons.
-
In the FilmStrip, click the ’+’ by the name.
-
Click on the name in the canvas. All of the letters are selected in the FilmStrip.
-
Click on one of the letters in the FilmStrip. That letter is selected individually and can be moved.
-
Click the Draw tab, then click Box Select
 , and drag to select both octagons.
 -
Click Group
 . The octagons now form a group in the FilmStrip.
 -
With the grouped octagons selected, click Ungroup
 .
. -
Click New Window
 on the File menu to open a new Canvas.
 -
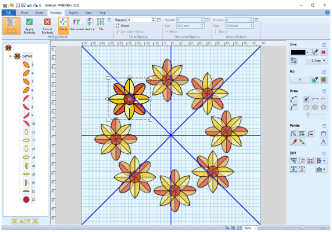
On the Insert tab, use Design Gallery
 to load a flower design.
 -
Click the Multiply tab.
-
Ensure that Circle
 is selected.
 -
Move the design to the top left, then click Enable Multiply
 . The design is repeated in a circle.
 -
Set the number of repeats to 8, and drag the designs into position.
-
Click Apply Multiply
 to finish the Multiply.
 -
In the Quick Access toolbar, click Save As
 .
. -
Save the drawing.
-
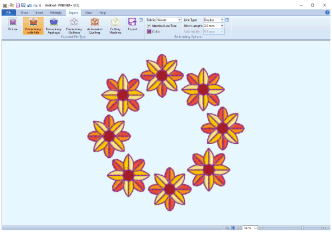
Click the Export tab, then click Embroidery with Fills
 . An embroidery of your design is displayed.
 -
Click Export
 and save your embroidery as a .vp4 file for stitching out.
This will draw using the default colors.
The pointer changes to a ’x’, and a rough filled shape is created.
You can also finish using the right-click menu.
You can also pick a color ![]() from the background picture, set the width of the line, or select No Line
from the background picture, set the width of the line, or select No Line ![]() .
.
You can also use Freehand Draw ![]() with three smoothing options, or load a picture in the View tab with Load Background
with three smoothing options, or load a picture in the View tab with Load Background ![]() , and then use Trace Line
, and then use Trace Line ![]() , Trace Area
, Trace Area ![]() or Trace Area & Hole
or Trace Area & Hole ![]() to trace the background picture.
to trace the background picture.
The shape that you just drew is selected. It is using the colors that you chose.
Change the colors for a selected object in the Design Panel. Click outside all objects or use Select None ![]() when selecting colors for a new object.
when selecting colors for a new object.
In the Design Panel and the selected shape, the Line and Fill colors exchange places. The colors also change on the shape in the FilmStrip.
Editing
There is no longer a fill color in the shape, and in the FilmStrip you can see that it is now two lines.
You cannot Join closed areas, only open lines.
If you cut your Bezier shape with the Knife, some of the points may be corner points already and cannot be converted.
You can also convert line types using Convert to Point Line ![]() and Convert to Bezier Line
and Convert to Bezier Line ![]() .
.
Reshaping, Selecting and Grouping
The letters in the name are within a group.
Use Ungroup All ![]() to ungroup nested groups.
to ungroup nested groups.
Multiply
Here I used Daffodil in the Flower and Leaves folder, then deleted the leaves and resized it.
You can also multiply designs in a line or within a grid with the Tile option.
Exporting
Use this version if you need to make further adjustments later.
If desired, click the Draw tab and adjust your drawing further - for example, use thicker outlines for a satin line border.